A Ceiling Stain Near the Fireplace Often Starts at the Flashing, Not the Roof
Hail and high winds separate counterflashing from masonry. The gap is invisible from the ground.
We inspect all three flashing zones in Lakewood before touching anything, then repair the exact zone that failed.
Dispatching from 12640 W Cedar Dr, Unit 7, Lakewood.
Three zones, checked every visit
- Step flashing along shingle courses
- Counterflashing at the masonry joint
- Apron flashing at the chimney base
- Photo record before and after every zone
Six places a flashing problem shows up on one chimney
Your roofer checked the shingles and found nothing wrong. That's because the failure point and the symptom you notice are rarely in the same place.
-
Cap Rust colored streaks running down the brick
A rusted or undersized cap lets runoff wash down the exterior face instead of clearing the chimney. It's a cap problem, not a flashing one, and it's easy to rule out during the same visit.
See cap installation -
Crown Crumbling grey concrete at the top of the stack
A cracked crown lets water into the chase from above, independent of the flashing below. We check it on every flashing call since both failures can be present at once.
See crown repair -
Counterflashing Water stain on the ceiling near the fireplace
The most common source. The upper metal layer embedded in the mortar joint has pulled free, usually from a hail impact or a hard freeze thaw cycle. We reembed or reseal depending on how far it's separated.
See leak repair -
Step flashing Damp drywall along the sloped ceiling line
One of the individual L-shaped pieces woven between the shingle courses has lifted or corroded through. Each piece is checked course by course before we touch the counterflashing above it.
See full chimney repair -
Apron flashing Stain only appears after wind driven rain
The single-piece apron at the downhill base of the chimney has a lifted corner, so only driving rain forces water past it. It's the most common single-point failure we find on older Lakewood homes.
See leak repair -
Roof deck penetration Musty smell in the attic near the chimney chase
Where the chimney passes through the roof structure, the seal around the opening has failed on one side. We check all four sides for continuous seal integrity before closing a flashing job.
See leak repair
Lakewood's climate makes flashing a high stress joint
Jefferson County rooflines take more punishment per square foot than most of the country.
Lakewood sits at roughly 5,400 feet. The Front Range gets hail events with larger average stone diameter than most of the lower 48. Wind gusts during spring and fall storms regularly exceed 60 mph at ground level.
At chimney height, especially on two-story homes in Belmar, Eiber, or the Green Mountain corridor, that load is higher. Metal flashing expands and contracts with temperature swings that can reach 80°F within a single day in spring. The thermal expansion gap, the space built into a well-installed flashing system to allow for that movement, closes under compression, then tears open under tension.
AR Chimney Pros operates from 12640 W Cedar Drive in Lakewood. We're less than four miles from most Lakewood residential rooflines. That proximity matters when a flashing crew needs to reach a Jefferson County address without cross metro travel. Our 20 person crew structure means we can schedule a dedicated diagnostic visit and a separate repair visit, not one rushed appointment trying to do both.
- 5,400 ft
- Elevation in Lakewood
- 60 mph
- Gusts common in spring and fall storms
- 3 zones
- Inspected on every flashing call
The job that looked like a roof replacement until we got up there
Two contractors quoted a full roof replacement. Neither had gone up to inspect the flashing directly.
From the Lakewood crew
I want to walk you through a specific job we ran in the Eiber neighborhood last spring. The homeowner had been quoted for a full roof replacement by two separate contractors. Both cited water intrusion near the chimney base.
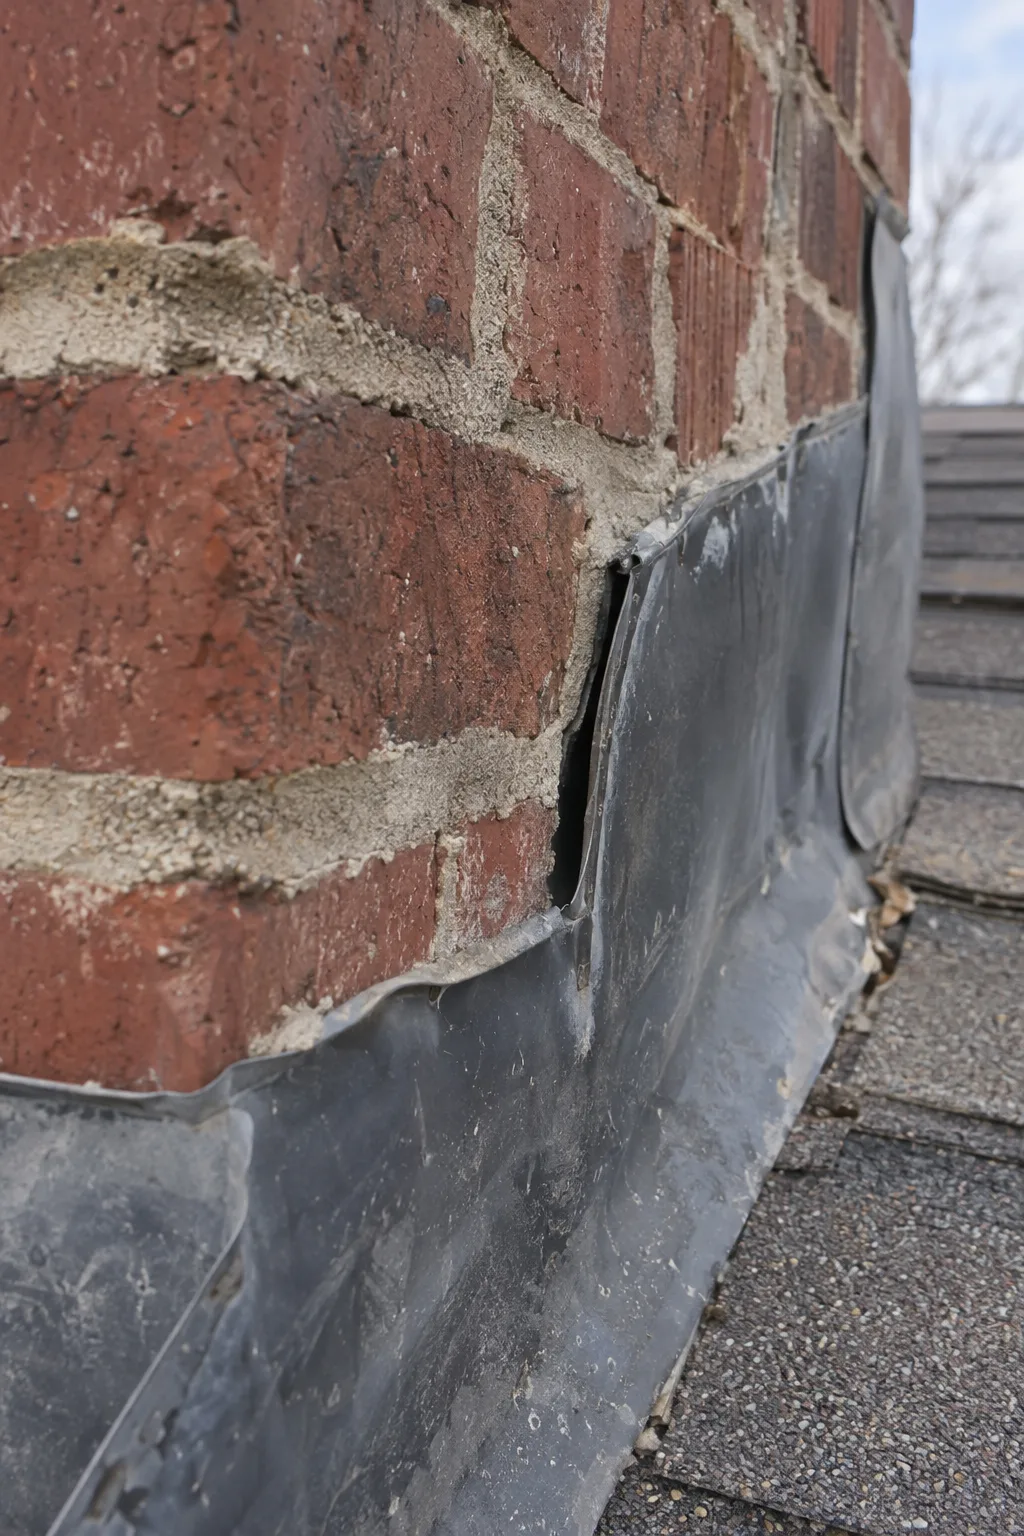
When our crew got on that roof, the shingles were in good shape. Mid-range age, no granule loss worth documenting, no lifted tabs. The problem was sitting right at the counterflashing, the upper metal layer embedded into the mortar joint. Counterflashing is designed to lap over the step flashing below it, creating a two-layer water barrier. The sealant at the masonry joint had fully separated. Not partially. Fully. We could see daylight through the gap at two courses.
The apron flashing, the single-piece section installed at the base of the chimney on the downhill side, had also lifted slightly at the left corner. That's the most common single-point failure location we find on older homes in Lakewood. The original installer had used standard caulk as the only sealant at the apron toe. After a few freeze-thaw cycles, it cracked clean through.
We documented every failure point with photos before touching anything. Step flashing along the side courses, the individual L-shaped metal pieces woven between each course of shingles, was intact. That mattered, because it meant we didn't need a full replacement. We reembedded the counterflashing at the separated mortar joint, reset the apron corner with a proper metal bend, and applied a compatible flexible sealant rated for Colorado's UV and freeze-thaw load. The homeowner skipped a roof replacement that wasn't needed.
That's the difference a zone-by-zone inspection makes.
Flashing repair works best when the failure zone is identified first
Every flashing failure has a specific location, and that location determines the right repair.
Homeowners sometimes ask whether a caulk-only patch will hold. Here's the honest answer: it depends entirely on the zone and the severity of separation. A hairline separation at the cap flashing sealant, the flexible material where counterflashing meets masonry, can sometimes be addressed with a quality sealant reapplication. An active separation at a counterflashing joint, or a lifted apron flashing corner, requires metal work. Sealant alone won't hold against thermal expansion cycles at Colorado elevations. We tell customers up front which zones have sealant-serviceable issues and which zones need metal repair. No surprises at the end of the job.
| Caulk-only patch | Zone-specific repair |
|---|---|
| Temporary seal at the surface | Metal correction at the failure point |
| Fails after 1 to 2 freeze-thaw cycles | Rated for Colorado elevation and UV load |
| Leaves thermal expansion gap unaddressed | Verifies movement space is present and clear |
| No documentation of underlying failure | Photo record before and after every zone |
| May require repeat service within one season | Adjacent zones confirmed before job closes |
Our flashing repair standards
- Three-zone inspection before any work begins Step flashing along shingle courses, counterflashing at the masonry joint, and apron flashing at the chimney base.
- Saddle and cricket assessment on chimneys wider than 30 inches A saddle, also called a cricket, is a peaked diverter built behind wide chimneys to redirect water around the base. Its absence is a common pooling source we check on every wide chimney.
- No caulk-only patches on active metal separations Sealant is used where appropriate. Metal repair is used where required.
- Thermal expansion gap verification We confirm the movement space between flashing and masonry is present and unobstructed after repair.
- Roof deck penetration review All four sides of the roof deck penetration, the opening where the chimney passes through the roof structure, are checked for continuous seal integrity.
- Material matching Aluminum, galvanized steel, and stainless options matched to the existing roof and chimney material profile.
- Photo documentation before and after every repair
How we execute a chimney flashing repair
The repair process follows a fixed sequence: inspect, repair, verify, every time.
-
1
Starting from the interior stain
We map the stain before we go on the roof.
If a ceiling stain is present, we map its location relative to the chimney chase before going on the roof. Interior stain position tells us which side of the chimney to inspect first. It's a faster path to the failure zone than starting at the exterior without context.
On the roof, we inspect all three flashing zones in sequence. Step flashing is checked course by course. Counterflashing position and sealant condition at every mortar joint is documented. The apron flashing toe is checked for lift, crack, or separation.
-
2
Zone repair and material work
Repair scope is confirmed before work begins.
Metal separations are corrected with properly formed flashing pieces, not stretched or forced over the existing profile. Counterflashing is reembedded or resealed at the mortar joint using a flexible product rated for freeze-thaw cycling. Apron flashing corners are reformed or replaced depending on the degree of lift. All new sealant applications receive a minimum cure window before the job is closed.
-
3
Post-service verification
We walk and photograph every zone before leaving.
If weather permits, a water test is performed. The homeowner receives a plain-language summary of what failed, what was repaired, and which zones, if any, should be monitored in the next season.
See leak repair
Related repair services
If the inspection finds damage beyond the flashing, these are the next steps.
Areas we serve
AR Chimney Pros handles chimney flashing repair across Lakewood and the surrounding communities.
We serve Wheat Ridge, Arvada, Englewood, Littleton, Edgewater, Morrison, Golden, and Sheridan. We also cover Denver, Westminster, Aurora, Thornton, Highlands Ranch, Centennial, Broomfield, and Boulder. For a full list of service areas, contact us directly.
Frequently asked questions
Flashing questions we answer most often on the phone.
How much does chimney flashing repair cost in Lakewood, CO?
Cost varies by failure zone, material type, and whether metal fabrication is required versus sealant reapplication. A zone-by-zone inspection identifies exactly which repairs are needed before any quote is given. That keeps you from paying for work that isn't required. Call 720-608-7668 for a diagnostic appointment.
My roofer already checked the shingles and found nothing. Can flashing really be the cause?
Yes. Flashing failures are the most common chimney leak source that shingle inspections miss. Roofers inspect shingle surfaces, not the counterflashing joint where metal meets masonry. That gap is often invisible from the roof surface until a technician inspects it directly. AR Chimney Pros documents every flashing zone with photos before and after repair.
What's the difference between resealing flashing and actually repairing it?
Resealing applies new sealant at the surface. Actual repair corrects the metal separation causing the failure. A sealant-only application fails after one or two freeze-thaw cycles when active metal separation is the root problem. We identify which zones need sealant work and which require metal correction before any work begins.
How long does a chimney flashing repair take from inspection to finished work?
Most flashing repairs complete in a single visit once the failure zone is confirmed. The diagnostic and repair visits may be scheduled separately on larger jobs. That separation keeps the diagnostic thorough and the repair focused. Same-day combinations are available when the scope is straightforward.
Do you inspect all three flashing zones, or just the area that's visibly damaged?
All three zones are inspected every time: step flashing, counterflashing, and apron flashing. A visible failure at one zone doesn't rule out stress at an adjacent zone. Missing a secondary failure means the repair won't hold through the next storm season. Adjacent zones are confirmed intact before the job closes.
Will a wide chimney need a saddle, and how do I know if mine is missing one?
Chimneys wider than 30 inches typically require a saddle to redirect water around the back of the chimney base. Without one, water pools directly against the masonry and accelerates flashing failure. We assess saddle presence and condition on every wide chimney we inspect. If yours is absent or damaged, we document it as part of the repair scope.
More questions about your system? Read the full FAQ.
Schedule your flashing repair in Lakewood
Chimney flashing repair in Lakewood starts with a zone-by-zone inspection, not a caulk gun.
If you've got a ceiling stain near the fireplace, or a roofer has checked the shingles and come up empty, the flashing is the next place to look. Call AR Chimney Pros at 720-608-7668 or email info@archimneypros.com to schedule. Our crews dispatch from W Cedar Drive in Lakewood. We're close, and we keep appointments on schedule.